This article is the second part of a series in which we go through the process of logging models using Mlflow, serving them as an API endpoint, and finally scaling them up according to our application needs. We encourage you to read our previous article in which we show how to deploy a tracking instance on k8s and check the hands-on prerequisites (secrets, environment variables…) as we will continue to build upon them here.
In the following, we show how to serve a machine learning model that is already registered in Mlflow and expose it as an API endpoint on k8s.
Part 2— How to serve a model as an API on Kubernetes?
Introduction
It is obvious that tracking and optimizing models’ performance is an important part of creating ML models. Once done the next challenge is to integrate them into an application or a product in order to use their predictions. This is what we call models serving or inference. There are different frameworks and techniques that allow us to do it. Yet, here we will focus on Mlflow and we will show how efficient and straightforward it could be.
Build and deploy the serving image
The different configuration files used here are part of the hands-on repository Basically, we need to:
1. Prepare the Mlflow serving docker image and push it to the container registry on GCP.
cd mlflow-serving-exampledocker build --tag $/mlflow_serving:v1
--file docker_mlflow_serving .docker push $/mlflow_serving:v1
2. Prepare the Kubernetes deployment file
by modifying the container section and map it to the docker image previously pushed to GCR, the model path and the serving port.
| apiVersion: apps/v1 | |
| kind: Deployment | |
| metadata: | |
| name: mlflow-serving | |
| labels: | |
| app: serve-ML-model-mlflow | |
| spec: | |
| replicas: 1 | |
| selector: | |
| matchLabels: | |
| app: mlflow-serving | |
| template: | |
| metadata: | |
| labels: | |
| app: mlflow-serving | |
| spec: | |
| containers: | |
| – name: mlflow-serving | |
| image: GCR_REPO/mlflow_serving:v1 #change here | |
| env: | |
| – name: MODEL_URI | |
| value: “gs://../artifacts/../../artifacts/..“ #change here | |
| – name: SERVING_PORT | |
| value: “8082“ | |
| – name: GOOGLE_APPLICATION_CREDENTIALS | |
| value: “/etc/secrets/keyfile.json“ | |
| volumeMounts: | |
| – name: gcsfs-creds | |
| mountPath: “/etc/secrets“ | |
| readOnly: true | |
| resources: | |
| requests: | |
| cpu: “1000m“ | |
| volumes: | |
| – name: gcsfs-creds | |
| secret: | |
| secretName: gcsfs-creds | |
| items: | |
| – key: keyfile.json | |
| path: keyfile.json |
3. Run deployment commands
kubectl create -f deployments/mlflow-serving/mlflow_serving.yaml
4. Expose the deployment for external access
With the following command, a new resource will be created to redirect external traffic to our API.
kubectl expose deployment mlflow-serving --port 8082 --type="LoadBalancer"
5. Check the deployment & query the endpoint
If the deployment is successful, mlflow-serving should be UP and one pod should be available. You can check that by typing kubectl get pods

The final step is to check the external IP address that was assigned to the load balancer redirecting traffic to our API container using kubectl get services and test the response to a few queries.

An example code to perform those queries could be found in the following notebook in which we load few rows of data, select features, convert them to JSON format, and send them in a post request to the API.
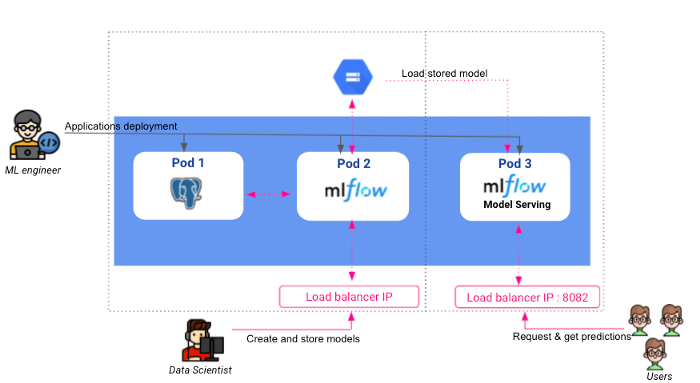
Now, combining the steps done in our previous and current articles our final architecture would look like the following:

Conclusion
In this article, we showed that we can easily deploy machine learning models as an API endpoint using the Mlflow serving module.
As you may notice, in our current deployment only one pod was created to serve the model. Although this works well for small applications where we don’t expect multiple parallel queries, it could quickly show its limits on others as a single pod has limited resources. Moreover, this way the application won’t be able to use more than one node computing power. In the following and last article of this series, we will address the scalability issue. We will first highlight the bottlenecks and try to solve them in order to get a scalable application that takes advantage of the power of our Kubernetes cluster.

 BLOG
BLOG


